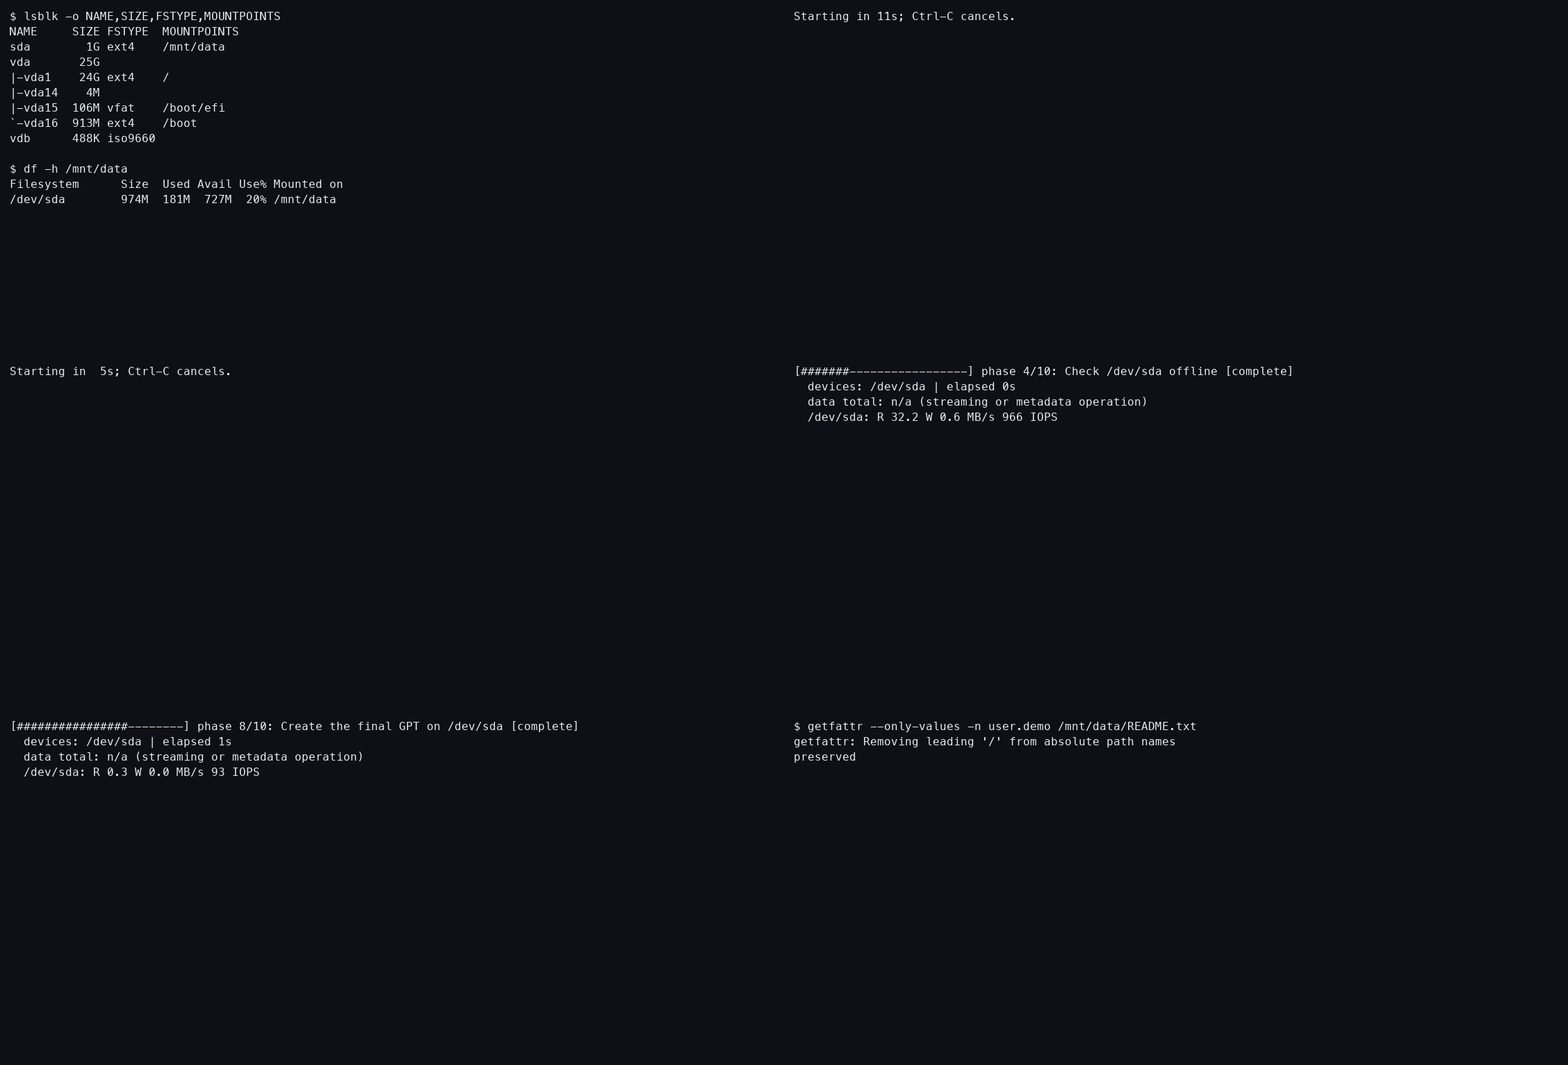
Use reformat.sh to convert an attached disk while Ubuntu keeps running on its
existing root drive. The target can be a mount point, a whole block device, or its
single partition. One invocation converts one disk.
| Your starting point | Command options | Result |
|---|---|---|
| ext4 volume with more than 50% free | /mnt/data |
Preserve files and metadata, then mount ZFS at the same path |
| ext4 volume without room for a second copy | --backup=REMOTE:PATH /mnt/data |
Back up, read-back verify, format as ZFS, and restore |
| Empty disk or data you intend to discard | --erase /dev/disk/by-id/DEVICE |
Create an empty ZFS pool and dataset |
| New VPS with a volume attached at creation | cloud-init volume template | Prepare an interactive installer launcher |
Watch a real volume conversion or read its fixture and verification details. The root-drive workflow is described in the main guide.
Stop applications using the volume, leave its mount point, and run:
cd /
curl -fsSL https://pirate.github.io/zfsify/reformat.sh | sudo bash -s -- /mnt/data
The installer identifies the physical disk and highlights the recommended method. Review the plan and explicitly confirm, even when using command-line flags. It installs needed tools and unmounts the source. It refuses to force an unmount or terminate applications. Close shells and processes holding the volume open before retrying a busy-filesystem error.
When two copies fit with metadata headroom, 50/50 is the recommended method. It shrinks ext4, copies to temporary ZFS storage at the disk’s end, and verifies every file and its metadata. A temporary mirror moves the verified copy to the front of the disk, then the final partition and pool expand to use the remaining capacity. The source is reclaimed only after verification. Files, numeric ownership, permissions, ACLs, xattrs, hard links, symlinks, and sparse allocation are retained.
The filesystem returns at its original mount point. The installer comments out its previous fstab entry, enables ZFS import/mount services, and saves the original fstab and conversion log in the private work directory printed at startup. It does not reboot the server or install a bootloader on the data disk.
Preservation and backup require ext4 on a whole disk or one direct partition. The installer accepts Ubuntu 22.04, 24.04, and 26.04, with ZFS packages available for the running kernel and 512-byte logical disk sectors. It refuses multiple source partitions, active device-mapper/RAID mappings, swap, and disks belonging to the running root filesystem or an imported ZFS pool.
Below 50% used is an eligibility threshold; filesystem metadata and temporary ZFS overhead also need space. Review the printed device path and keep an independent backup of important files. Both temporary copies share one physical disk during in-place migration.
Use an existing rclone remote:
curl -fsSL https://pirate.github.io/zfsify/reformat.sh | sudo bash -s -- \
  --backup=myremote:zfsify-data /mnt/data
Use --backup without a value for guided destination setup: attach
a temporary ext4 Volume, open rclone’s own configuration, or select an existing
remote. The automatic space prompt also offers this choice. For unattended use,
configure the remote for the root process beforehand and pass --backup=REMOTE:PATH.
A separate mounted ext4 disk can hold the backup instead:
curl -fsSL https://pirate.github.io/zfsify/reformat.sh | sudo bash -s -- \
  --backup=/mnt/backup /mnt/data
The destination directory must already exist on a different physical disk. The installer takes an offline sparse tar archive with ownership, ACLs, and xattrs, streams it through rclone, and downloads the entire archive to verify SHA-256 before erasing the source. It verifies the restored stream again and retains the backup at a unique destination. These operations need enough remote space and transfer bandwidth, rather than enough RAM to hold the dataset.
When 50/50 does not fit, automatic selection opens guided backup setup and waits
for destination selection and confirmation. Without a terminal, setup stops
before conversion; pass an explicit --backup=DESTINATION for unattended use.
Slice-by-slice is unavailable for data volumes; erase always requires an explicit
request.
Attach the disk using your provider, identify its stable device path with
lsblk, and pass --erase explicitly:
lsblk -o NAME,PATH,SIZE,FSTYPE,MOUNTPOINTS
curl -fsSL https://pirate.github.io/zfsify/reformat.sh | sudo bash -s -- \
  --erase /dev/disk/by-id/YOUR_EMPTY_VOLUME
On a data volume, --erase discards every file. The limited accounts/settings
restore used by root-drive erase mode does not apply to data disks.
The new pool name starts with zfsify_. An unmounted input gets a generated
mount point under /mnt/zfsify-…; a mounted input keeps its mount point. The
installer prints the exact pool, dataset, and mount path on completion.
findmnt --target /mnt/data
sudo zpool status
sudo zfs list
The data dataset uses lz4 compression, POSIX ACLs, and efficient xattr storage. Create snapshots for your application at a suitable quiescent point:
dataset=$(findmnt -n -o SOURCE --target /mnt/data)
sudo zfs snapshot "$dataset@before-deploy"
sudo zfs list -t snapshot
The root installer’s daily and pre-APT snapshot policy covers its root dataset. Set a retention schedule appropriate to each data dataset separately.
The installer sets autoexpand=on and enrolls the pool by GUID in its boot-time
growth service. After enlarging the same attached disk through your provider,
a normal server reboot expands its partition and pool. DigitalOcean Volume
2 → 3 GiB growth was verified without running guest partition or pool-growth
commands. See the validation report. This applies to the single
partition layout created by reformat.sh; manually assembled multi-device pools
need a growth plan for their topology.
The tools under tools/ cover storage inspection, explicit pool naming,
additional vdevs, and DigitalOcean volume provisioning. They are separate from
reformat.sh: they do not preserve an ext4 source, install ZFSBootMenu, or enroll
arbitrary pool topologies in the migration installer’s growth service.
Clone the repository to use them:
git clone https://github.com/pirate/zfsify.git
cd zfsify
sudo bash tools/volumes/setup.sh
The setup script installs missing dependencies. DigitalOcean metadata and API
helpers are provider-specific; formatting and ZFS commands operate on local
block devices. Provider operations use DO_API_TOKEN from a private environment.
Neither root nor data conversion with reformat.sh needs a cloud API token.
sudo bash tools/volumes/zfs_list_disks.sh
sudo bash tools/volumes/find_new_disks.sh --all
sudo bash tools/digitalocean/terraform_get_droplet_metadata.sh
sudo --preserve-env=DO_API_TOKEN bash tools/digitalocean/terraform_list_volumes.sh sfo3
sudo --preserve-env=DO_API_TOKEN bash tools/volumes/summarize_storage.sh
A provider volume listing can include other Droplets’ volumes. Disk discovery uses heuristics oriented toward SCSI disks; it is not a complete provider-independent device inventory or authorization to format a candidate. Some inspection helpers install missing dependencies.
These helpers immediately format their new-device argument and do not provide
the migration installer’s root-disk and mounted-device protections. Use only
verified, unmounted data devices with no contents to retain. Do not target /,
rpool, or a device already holding needed data.
# Create a separate data pool at /zfs/datapool; erases the new device.
sudo bash tools/volumes/zfs_create_pool.sh datapool /dev/disk/by-id/YOUR_EMPTY_VOLUME

# Add capacity as another top-level vdev; erases the new device.
sudo bash tools/volumes/zfs_add_stripe.sh datapool /dev/disk/by-id/YOUR_SECOND_EMPTY_VOLUME

# Add a mirror to the specified existing vdev; erases the new device.
sudo bash tools/volumes/zfs_add_mirror.sh datapool \
  /dev/disk/by-id/YOUR_SECOND_EMPTY_VOLUME /dev/disk/by-id/YOUR_EXISTING_POOL_DEVICE
Adding a top-level vdev increases capacity without making that vdev redundant;
a failed unreplicated vdev can lose the pool. Attaching a mirror adds a replica
of an existing vdev. Choose the topology deliberately before using either helper.
The named-pool helper creates a test dataset and defaults to lz4 compression,
atime=off, and autoexpand=on.
The volume wizard provides an interactive view
of disks, pool operations, and usage examples. The
main.sh launcher accepts --poolname NAME.
Use the explicit commands above when you need to inspect each operation.
The Terraform helper creates and attaches a
billable DigitalOcean Volume, then opens the volume wizard. It accepts --size
(in GB), --name, and --region; it can install Terraform dependencies.
The helper auto-applies its saved plan. It retains the API token and Terraform
state under /tmp/do-volume-terraform, and removes an existing state file before
a new apply. Repeated runs can therefore leave earlier volumes unmanaged. Keep
that directory private and account for existing resources before running it.
These provisioning and wizard paths have not received the migration installer’s
end-to-end validation. Their created Volumes continue to incur charges until
you delete them through the provider.
tools/volumes/speedtest.sh POOL_NAME benchmarks /zfs/POOL_NAME. It writes and
removes speedtest_file and drops system caches, so reserve that filename and
schedule the workload appropriately. Compression and caching affect its numbers.
Keep the printed work directory and inspect its conversion.log, zpool status,
and lsblk output. A temporary ZFS member may still hold the only verified copy;
do not erase, detach, or reformat devices while determining the state. For a busy
filesystem before migration begins, stop its users and retry after it unmounts
cleanly. Share sanitized logs and the installer checksum when
reporting a reproducible issue.